Metagenome Assembly
Overview
Teaching: 30 min
Exercises: 10 minQuestions
Why should genomic data be assembled?
What is the difference between reads and contigs?
How can we assemble a metagenome?
Objectives
Understand what an assembly is.
Run a metagenomics assembly workflow.
Use an environment in a bioinformatic pipeline.
Assembling reads
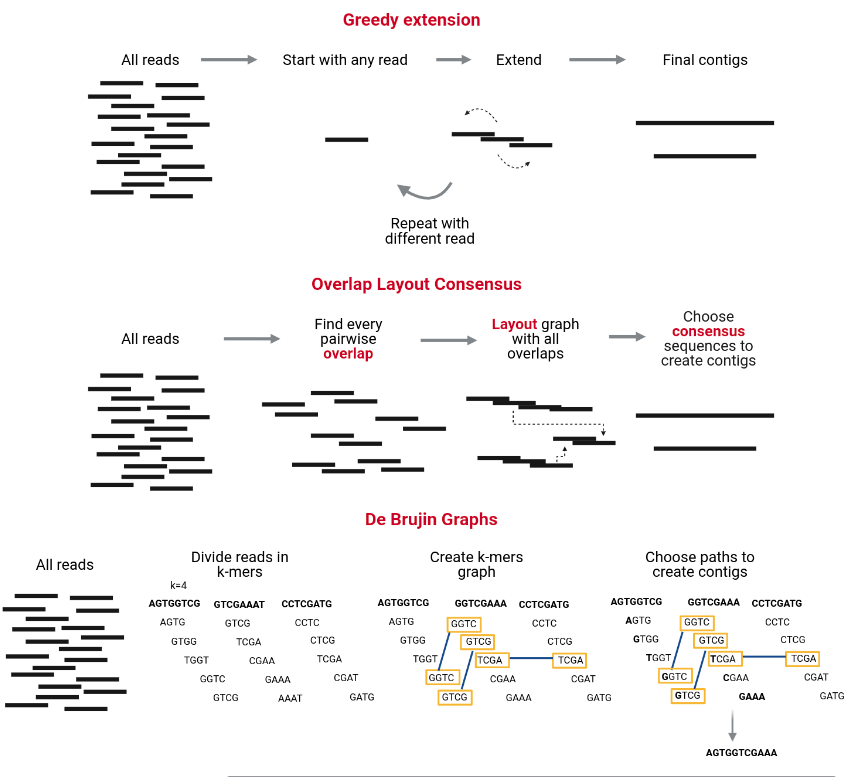
The assembly process groups reads into contigs and contigs into scaffolds to obtain (ideally) the sequence of a whole chromosome. There are many programs devoted to genome and metagenome assembly, some of the main strategies they use are Greedy extension, OLC, and De Bruijn charts. Contrary to metabarcoding, shotgun metagenomics needs an assembly step, which does not mean that metabarcoding never uses an assembly step but sometimes is unnecessary.
MetaSPAdes is an NGS de novo assembler for assembling large and complex metagenomics data, and it is one of the most used and recommended. It is part of the SPAdes toolkit, which contains several assembly pipelines.
Some of the problems faced by metagenomics assembly are:
- Differences in coverage between the genomes due to the differences in abundance in the sample.
- The fact that different species often share conserved regions.
- The presence of several strains of a single species in the community.
SPAdes already deals with the non-uniform coverage problem in its algorithm, so it is helpful for the assembly of simple communities, but the metaSPAdes algorithm deals with the other problems as well, allowing it to assemble metagenomes from complex communities.
The process of (metagenomics) assembly can take a long time, and if the connection to the server drops, the process is killed, and the process needs to restart. To avoid this, we can create a screen session.
Screen sessions
Starting a new session
A ‘session’ can be considered a new window or screen: you might open a terminal to do one thing on the computer and then open a new terminal to work on another task at the command line. You can start a session and give it a descriptive name:
$ screen -S assembly
This steps creates a session with the name ‘assembly’.
As you work, this session will stay active until you close it. Even if you log out or work on something else, the jobs you start in this session will run until completion.
Detach session (process keeps running in the background)
You can detach from a session by pressing control + a followed by d (for detach) on your keyboard. If you reconnect to your machine, you will have to reconnect to your session to see how it went.
Additional session commands
Seeing active sessions If you disconnect from your session or from your ssh, you will need to reconnect to an existing
screensession. You can see a list of existing sessions:$ screen -lsReconnecting to a session To reconnect to an existing session:
$ screen -r session_nameThe
-roption = ‘resume a detached screen session’Kill a session To end a session, type
exitafter reconnecting to the session:$ screen -r session_name $ exit
Let’s see if our program is installed correctly:
$ metaspades.py
SPAdes genome assembler v3.15.0 [metaSPAdes mode]

Usage: spades.py [options] -o <output_dir>

Basic options:
  -o <output_dir>             directory to store all the resulting files (required)
  --iontorrent                this flag is required for IonTorrent data
  --test                      runs SPAdes on a toy dataset
  -h, --help                  prints this usage message
  -v, --version               prints version

Input data:
  --12 <filename>             file with interlaced forward and reverse paired-end reads
  -1 <filename>               file with forward paired-end reads
  -2 <filename>               file with reverse paired-end reads
Activate your environment
If you do not have the metagenomics environment activated, the previous command should have given you an error. Before you proceed, activate the environment:
conda activate metagenomics
MetaSPAdes is a metagenomics assembler
The help we just saw tells us how to run metaspades.py. We are going
to use the most straightforward options, just specifying our forward paired-end
reads with -1 and reverse paired-end reads with -2, and the output
directory where we want our results to be stored.
$ cd ~/dc_workshop/data/trimmed_fastq
$ metaspades.py -1 JC1A_R1.trim.fastq.gz -2 JC1A_R2.trim.fastq.gz -o ../../results/assembly_JC1A
Now that it is running we should detach our screen with control + a d and wait for a few minutes while it running. And then attach the screen with
screen -r assembly to see how it went.
When the run is finished, it shows this message:
======= SPAdes pipeline finished.

SPAdes log can be found here: /home/dcuser/dc_workshop/results/assembly_JC1A/spades.log

Thank you for using SPAdes!
Now we can kill the screen with exit and look at our results in the main screen.
Now, let’s go to the output files:
$ cd ../../results/assembly_JC1A
$ ls -F
assembly_graph_after_simplification.gfa  corrected/              K55/             scaffolds.fasta
assembly_graph.fastg                     dataset.info            misc/            scaffolds.paths
assembly_graph_with_scaffolds.gfa        first_pe_contigs.fasta  params.txt       spades.log
before_rr.fasta                          input_dataset.yaml      pipeline_state/  strain_graph.gfa
contigs.fasta                            K21/                    run_spades.sh    tmp/
contigs.paths                            K33/                    run_spades.yaml
As we can see, MetaSPAdes gave us a lot of files. The ones with the assembly are the contigs.fasta and the scaffolds.fasta.
Also, we found three K folders: K21, K33, and K55; this contains the individual result files for an assembly
with k-mers equal to those numbers: 21, 33, and 55. The best-assembled results are
the ones that are displayed outside these k-folders. The folder corrected hold the corrected reads
with the SPAdes algorithm. Moreover, the file
assembly_graph_with_scaffolds.gfa have the information needed to visualize
our assembly by different means, like programs such as Bandage.
The contigs are just made from assembled reads, but the scaffolds are the result from a subsequent process in which the contigs are ordered, oriented, and connected with Ns.
We can recognize which sample our assembly outputs corresponds to because they are inside
the assembly results folder: assembly_JC1A/. However, the files within it do not have the
sample ID. If we need the files out of their folder, it is beneficial to rename them.
Exercise 1: Rename all files in a folder (needed in the next episode)
Add the prefix
JC1A(the sample ID) separated by a_to the beginning of the names of all the contents in theassembly_JC1A/directory. Remember that many solutions are possible.A)
$ mv * JC1A_
B)$ mv * JC1A_*
C)$ for name in *; do mv $name JC1A_; done
D)$ for name in *; do mv $name JC1A_$name; doneSolution
A) No, this option is going to give you as error
mv: target 'JC1A_' is not a directoryThis is becausemvhas two options:
mv file_1 file_2
mv file_1, file_2, ..... file_n directory
When a list of files is passed tomv, themvexpects the last parameters to be a directory.
Here,*gives you a list of all the files in the directory. The last parameter isJC1A_(whichmvexpects to be a directory).
B) No. Again, every file is sent to the same file.
C) No, every file is sent to the same file JC1A_
D) Yes, this is one of the possible solutions.¿Do you have another solution?
Exercise 2: Compare two fasta files from the assembly output
You want to know how many contigs and scaffolds result from the assembly. Use
contigs.fastaandscaffolds.fastafiles and sort the commands to create correct code lines.
Do they have the same number of lines? Why?
Hint: You can use the following commands:grep,|(pipe),-l,">",wc,filename.fastaSolution
$ grep '>' contigs.fasta | wc -l
$ grep '>' scaffolds.fasta | wc -l
A contig is created from reads and then a scaffold from a group of contigs, so we expect fewer lines in the
scaffolds.fasta.
Quality of assemblies
You can use several metrics to know the quality of your assemblies. MetaQuast is a program that gives you these metrics for metagenome assemblies in an interactive report and text files and plots.
Key Points
Assembly groups reads into contigs.
De Bruijn Graphs use Kmers to assembly cleaned reads.
Program screen allows you to keep open remote sessions.
MetaSPAdes is a metagenomes assembler.
Assemblers take FastQ files as input and produce a Fasta file as output.